Mapperty

Mapperty

Getting Started

Check Your iPhone (LiDAR Required)

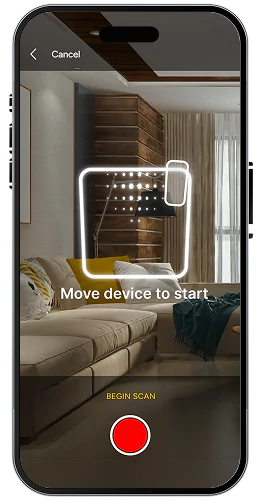
Mapperty Spaceview currently works only on iPhones with a built-in LiDAR scanner. Other iPhones and iPads can still log in via the web and upload files, but they cannot be used for scanning.

LiDAR-capable iPhones in Apple’s lineup are:
  • iPhone 12 Pro, 12 Pro Max
  • iPhone 13 Pro, 13 Pro Max
  • iPhone 14 Pro, 14 Pro Max
  • iPhone 15 Pro, 15 Pro Max
  • iPhone 16 Pro, 16 Pro Max CitizenSide+3Semiconductorinsight+3Apple Support Community+3

If your phone isn’t on this list, you’ll still be able to log in on the web and upload files, but you’ll need a LiDAR-capable iPhone to capture scans through the app.

Download the Mapperty iOS App & Sign Up

  • Go to the App Store on your LiDAR-capable iPhone
  • Download Mapperty Spaceview
  • Open the app and create your account with your email and password
  • Once logged in, you’ll land on your projects dashboard.
Download the Mapperty iOS App & Sign Up

Create a Project

Whether you’re working on a single-family home, retail store, showroom, office, or any other space, you start the same way:
  • Tap “Create Project”
  • Enter your project basics:
    1. Project name
    2. Property type (e.g., single-family residence, commercial/retail, showroom, etc.)
    3. Property address
    4. Approximate area and floor count
  • Save to move into detailed project steps.
Dashboard Mapperty

Create Project

Whether you’re working on a single-family home, retail store, showroom, office, or any other space, you start the same way:
  • Tap “Create Project”
  • Enter your project basics:
    1. Project name
    2. Property type (e.g., single-family residence, commercial/retail, showroom, etc.)
    3. Property address
    4. Approximate area and floor count
  • Save to move into detailed project steps.
  • Click on Create Project on Dashboard.
  • Fill all the required details for the project.

Scan Your Space With LiDAR

Inside your project, you’ll see options to Scan and/or Upload

  • Tap Scan to launch the Spaceview capture flow.
  • Walk through each room and, if applicable, each floor, following on-screen guidance.
  • For multi-story properties, you scan floor by floor so we can build accurate stacked
models.
  • When finished, your LiDAR scans are automatically attached to that project.

Add Existing Files & Photos (Mobile or Web)

To get the most accurate model, you can attach additional files:

On the iOS app (Project Details → Add Your Existing Files):
  • Old floor plans (PDF, DWG, RVT).
  • Existing CAD or Revit models.
  • LiDAR / point cloud files (USDZ, LAS, LAZ, XYZ, E57, etc., if you already have them).
  • Photos you take directly from the app (e.g., façade shots, interior photos).
  • Any other supporting documents or references
On the web (desktop):
  • Go to www.mapperty.com → Mapperty Spaceview.
  • Log in with the same account you use on the app.
  • Open your project and upload additional files that live on your computer (plans, old models, PDFs, etc.).

This way, you can scan on your phone and still upload heavier or archived files from your desktop.

Upload Media and Files - mapperty

Tell Us What You Need

Within the project, you’ll fill in a few key choices:
  • Level of Detail (LOD) – e.g., LOD 200 – approximate geometry, room sizes, layouts.
  • What you want in your model – floor plans, elevations, sections, permit-style drawings (if requested), etc.
  • Model type & file formats – Revit (.rvt), AutoCAD (.dwg), models, PDFs.
  • Purpose of the model – interior design/renovation, marketing visuals,
documentation, concept planning, etc.
  • Any special instructions or requirements (specific areas to focus on, items to ignore,
naming conventions, etc.).

When all required fields and files are added, you tap Submit.

Tell Us What You Need

We Review Your Project & Send a Quote

After you submit:
  • Your order status moves to “Under Review”.
  • Our team checks your scans, files, scope, floors, and requested LOD.
  • We prepare:
    1. A quote (total cost), and
    2. An estimated delivery date.
  • Make payments directly through the app or web portal.
  • View past invoices and receipts.

Once ready, your project shows “Quote Received”, and you can view all the details in Order Details / Order Summary.

Approve the Quote & Pay

If you’re happy with the price and timeline:
  • Click to accept the quote.
  • Complete secure payment via Stripe inside the app or web.
  • After successful payment, your order status updates to “Model in Production”.

We only start modeling after you accept the quote and payment is completed.

Approve the Quote & Pay

We Build Your Model (Revit / AutoCAD + PDFs)

Our modeling team now works on your project based on:
  • Your LiDAR scan.
  • Uploaded plans and documents, and
  • Your LOD and format selections.
We prepare:
  • Revit models (.rvt).
  • AutoCAD files (.dwg).
  • 3D models / BIM package (“Models”).
  • PDF drawings (floor plans, elevations, sections, or other documentation, if requested).

When the first delivery is ready, your order shows “Model Received” or “Latest Delivery”, and a Download Files button appears.

We Build Your Model

Review & Request Revisions

After you download your files:
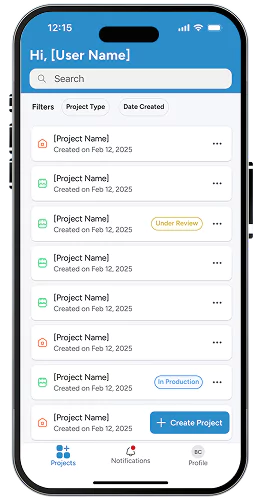
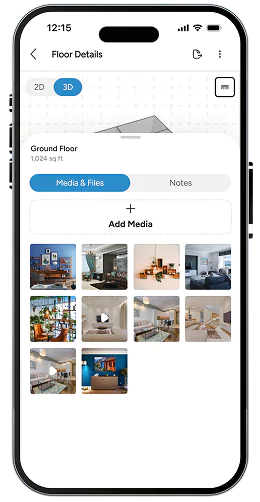
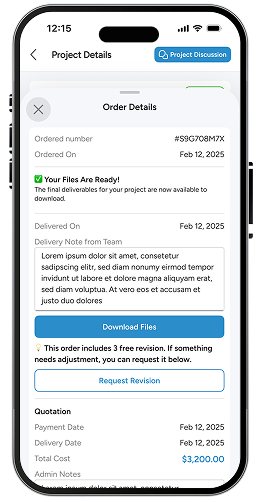
  • You can review them, compare against your site or existing documents, and make notes.
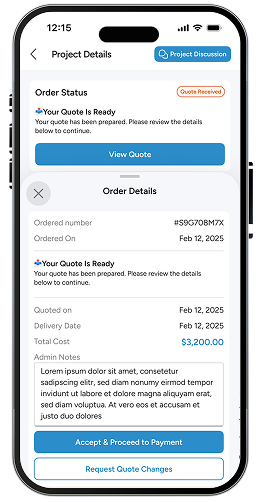
  • From within the project, you can request revisions and describe exactly what needs to be changed.
Your account includes:
  • 3 free revisions per order,
  • As long as they are requested within 7 days of the initial delivery date.

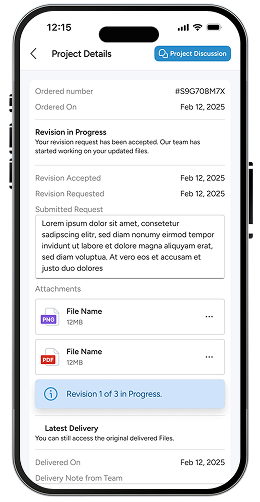
While revisions are in progress, you’ll see statuses reflecting that. When they’re done, the status updates to “Revised Files Ready”, and your updated files are available for download.

Once all three revisions are used or the 7-day window has passed, the project becomes locked:

  • You can still download all delivered files,
  • And use Project Discussion to communicate,
  • But new edits would require a new quote and order.
Review & Request Revisions
Scroll to Top